Bookmarks

I got to do an activity with children at a local library this week. What fun! We made 3 different bookmarks. These bookmarks make great use of scraps of paper and ribbon. I listed the materials I used for these bookmarks. You could use any papers and ribbons you have on hand. I would recommend the multipurpose glue if you are doing this project with children. The glue is easy to apply and it gives you a minute to get the paper in place before it dries.

MAGNETIC BOOKMARK
Cut your print paper 1 1/2 X 6"
Fold paper in half so it now measures 1 1/2 X 3
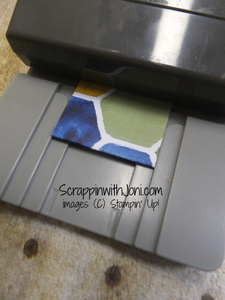
Insert open ends of print paper piece into Banner Triple Punch. This will put a banner end on both sides of your paper strip.
If you don't have a banner punch, you could leave them straight or corner round the corners.
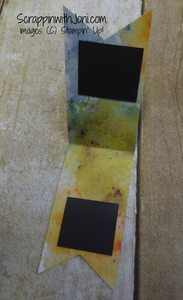
Add magnetic pieces inside your paper strip at each end. Magnetic adhesive sheets work great for this. I cut two 1' squares to apply to bookmark.
CORNER BOOKMARK
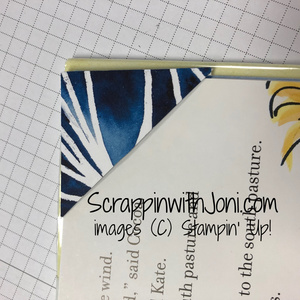
This bookmark is simply the corner of an envelope that is covered with pretty paper.

Begin with a sealed envelope. I scored 2" in from each side of the envelope.

Place the score lines in cutting rail of your paper cutter and cut diagonally.

Cut two 2" squares. Glue one 2" square to front of your diagonal envelope piece. Turn over and use edge of envelope as a guide to trim off excess paper.
Glue 2nd 2" square to back of envelope corner. Note the side you want to show needs to be glued down to envelope corner.

RIBBON BOOKMARK
Base: Cut a 2 X6" inch piece of solid color paper. I punched top with Detailed Tag Topper punch. Any Stampin' Up Tag Topper punch will work or you could leave a straight edge. If you leave a straight edge, punch a hole at top and adjust the size of the print paper you attach. You may want it longer.
Cut two 1 3/4 X 5" pieces of print paper. Glue print paper to each side of base.
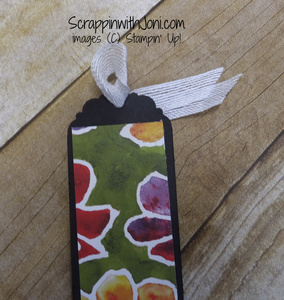
Cut an 8" piece of ribbon.
I showed the children how to attach ribbon without tying a knot. A knot can add bulk in your book.
Fold your ribbon in 1/2. Insert folded end of ribbon through opening at top of bookmark.

Insert both ends of ribbon through ribbon loop and pull.
 See A Silhouette Designer Series Paper
149443
See A Silhouette Designer Series Paper
149443

 Whisper White 5/8" (1.6 Cm) Flax Ribbon
148764
Whisper White 5/8" (1.6 Cm) Flax Ribbon
148764

