Curvy Gilded Autumn card

This beautiful paper from the Gilded Autumn paper pack looks great with a curvy edge.
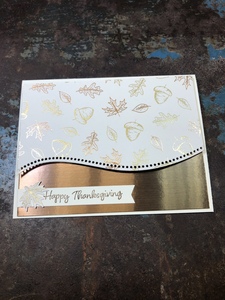
Card Base: Cut Very Vanilla 8 ½ X 11 paper in half widthwise. You now have two pieces 8 ½ X 5 ½ . Fold one of the pieces in half lengthwise for your card front. The card front now measures 4 ¼ X 5 ½.
Card Mat: Cut Very Vanilla 4 X 5 ¼
Card Front: Cut Brushed Metallic paper 2 X 5 ¼
Cut print from Gilded Autumn paper pack 3 X 5 ¼
Attach Brushed Metallic paper to the lower edge of the front of the card mat.
Use Curvy die to add curved shape to the lower length of the print paper. Attach the print paper even with the top of the card mat with dimensionals. Attach card mat to card base.
Cut strip of Very Vanilla paper ½ X 3 ½. Banner punch 1 end with Banners Pick a Punch. Stamp Sentiment on banner piece and attach to lower edge of card front on the Brushed Metallic card stock. I punched a leaf from the print paper with a punch from Autumn Punch pack. Attach punched piece to banner.
That’s it; you have finished your card front. For the inside of your card, cut a piece of Very Vanilla 4 X 5 ¼. Stamp a sentiment or write a note before attaching this piece inside your card.

If you want to cover your envelope flap to match your card, you can find directions here: http://www.scrappinwithjoni.com/blogs/covering-your-envelope-flap


