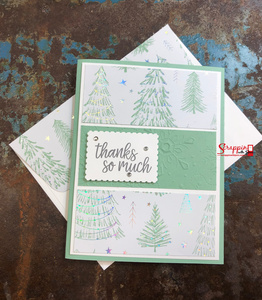
Whimsy & Wonder Thanks So Much

I have lots of pieces of print paper from my Christmas cards, this is a design that makes good use of those pieces.

I made two versions of this card, one of the card base colors is in parentheses.
Card Base: Cut Mint Macaron (Blushing Bride) 8 ½ X 11 paper in half widthwise. You now have two pieces 8 ½ X 5 ½ . Fold one of the pieces in half lengthwise for your card front. The card front now measures 4 ¼ X 5 ½.
Card Mat: Cut Basic White 4 X 5 ¼ .
Card Front: Cut one piece of cardstock the same color as the card base 1 ⅝ X 3 ¾. Emboss this piece with the Wintry embossing folder.
Cut two pieces of Whimsy & Wonder print paper 1 ⅝ X 3 ¾.
Attach one of the print papers at the top of the Basic White card mat and attach the second print paper at the bottom of the Basic White card mat. Attach the embossed cardstock piece between the print papers. Attach this Basic White card mat to the card base.
Stamp Thanks So Much from the In Symmetry stamp set with Basic Gray ink on Basic White paper. Punch this sentiment with the Rectangular Postage Stamp punch. Attach this stamped, punched piece to the embossed piece on the card front with dimensionals. Add 3 basic rhinestones.
That’s it; you have finished your card front. For the inside of your card, cut a piece of Basic White 4 X 5 ¼. Stamp a sentiment or write a note before attaching this piece inside your card.

Another version of this card.

Another version of this card
Another version of this card

If you want to cover your envelope flap to match your card, you can find directions here: http://www.scrappinwithjoni.com/blogs/covering-your-envelope-flap
 Basic Gray Classic Stampin' Pad
149165
Basic Gray Classic Stampin' Pad
149165
 In Symmetry Photopolymer Stamp Set
155140
In Symmetry Photopolymer Stamp Set
155140
 Rectangular Postage Stamp Punch
152709
Rectangular Postage Stamp Punch
152709
 Basic White 8 1/2" X 11" Cardstock
159276
Basic White 8 1/2" X 11" Cardstock
159276
 Mint Macaron 8-1/2" X 11" Cardstock
138337
Mint Macaron 8-1/2" X 11" Cardstock
138337
 Blushing Bride Classic Stampin' Ink Refill
131157
Blushing Bride Classic Stampin' Ink Refill
131157
 Whimsy & Wonder 12" X 12" (30.5 X 30.5 Cm) Specialty Designer Series Paper
156329
Whimsy & Wonder 12" X 12" (30.5 X 30.5 Cm) Specialty Designer Series Paper
156329


